Welcome to StudyPass
StudyPass is your college's private mobile app for staying in touch with students and colleagues. This guide walks you through everything you can do in the app, step by step. No technical knowledge needed.
The app has three main areas, which you switch between using the tabs along the bottom of the screen:
- Resources — files, documents and folders shared by your college.
- PinBoard — a social feed of posts (like Instagram) where you can share updates, photos and videos, and people can like and comment.
- Chats — private messaging with individuals and groups (like WhatsApp or iMessage).
Jump to a topic
Signing in
The first time you open the app you'll set it up for your college, then sign in with the details from your invitation email.
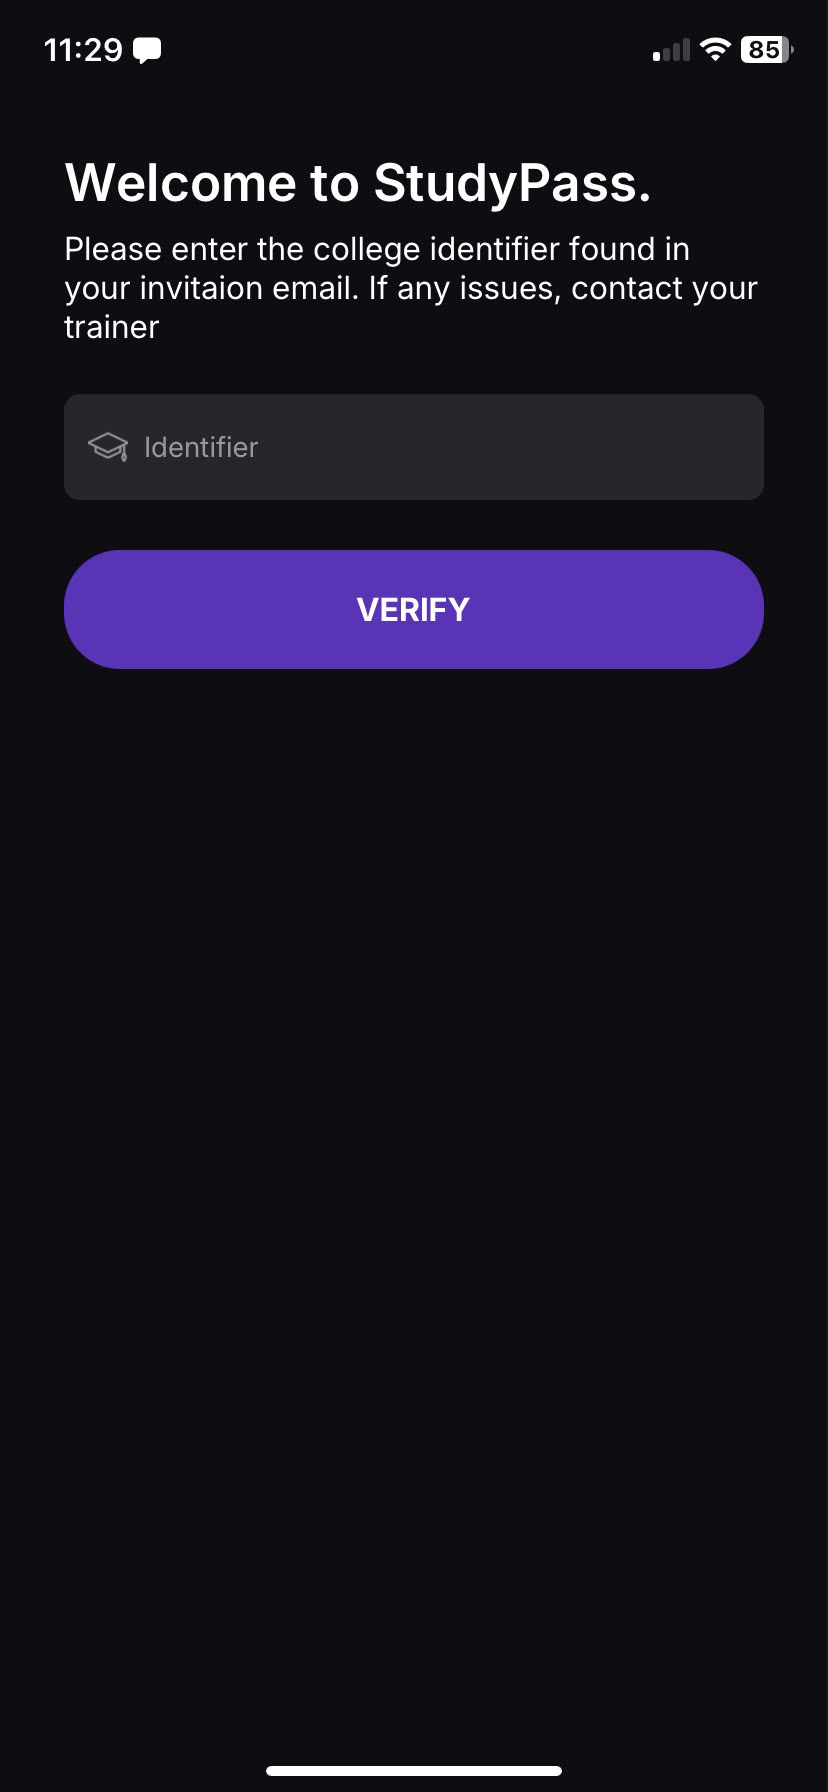
Step 1 — Enter your college identifier
When you first open the app you'll see a Welcome to StudyPass screen asking for your college identifier. This is a short code from your invitation email that connects the app to your college.
- Type the identifier into the box.
- Tap VERIFY.
- The app loads your college's branding and takes you to the sign-in screen.
 📷Screenshot: college identifier screen
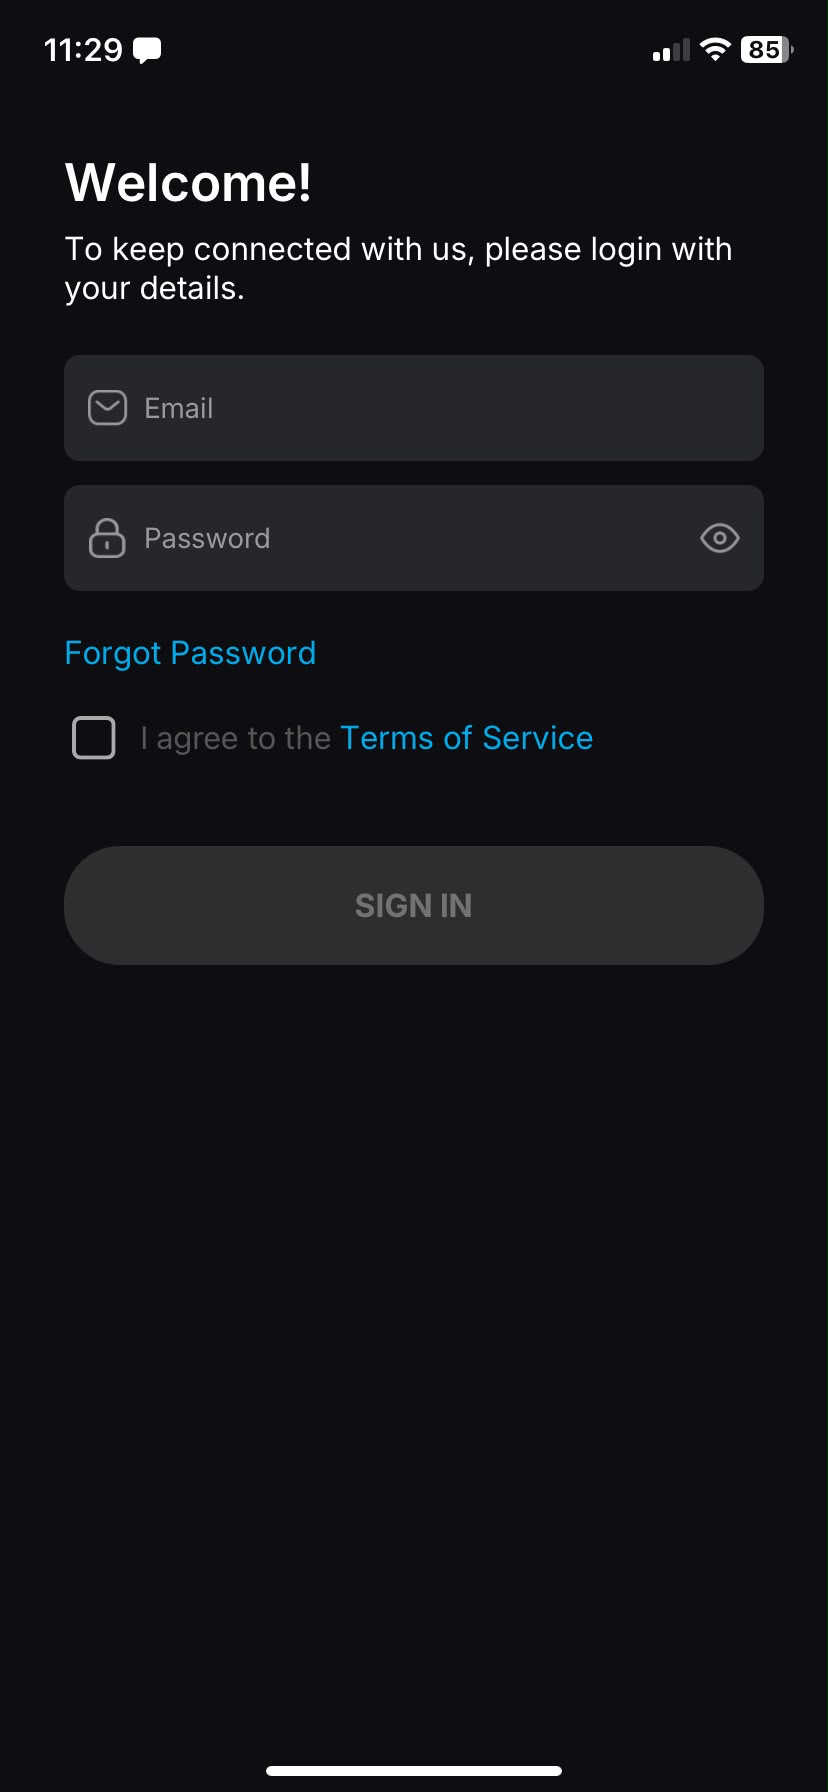
Step 2 — Sign in
- Enter your email and password. Tap the eye icon to show or hide your password.
- Tick I agree to the Terms of Service. The SIGN IN button stays greyed out until your email, password and this tick are all filled in.
- Tap SIGN IN.
 📷Screenshot: sign-in screen
First sign-in: set your own password
If your account was created with a temporary password, the app will ask you to create a new password straight after signing in. Choose a new password (at least 10 characters) to continue.
Forgot your password?
- On the sign-in screen, tap Forgot Password.
- Enter your registered email. A one-time code (OTP) is emailed to you.
- Enter the code, then set and confirm your new password.
- You'll see a confirmation, then you can sign in with the new password.
Finding your way around
Once you're signed in, everything is reached from the three tabs at the bottom of the screen.
The bottom tabs
- Resources (left) — browse files and folders.
- PinBoard (middle) — the posts feed.
- Chats (right) — your conversations. A small dot appears on this tab when you have unread messages.
 📷Screenshot: the three bottom tabs
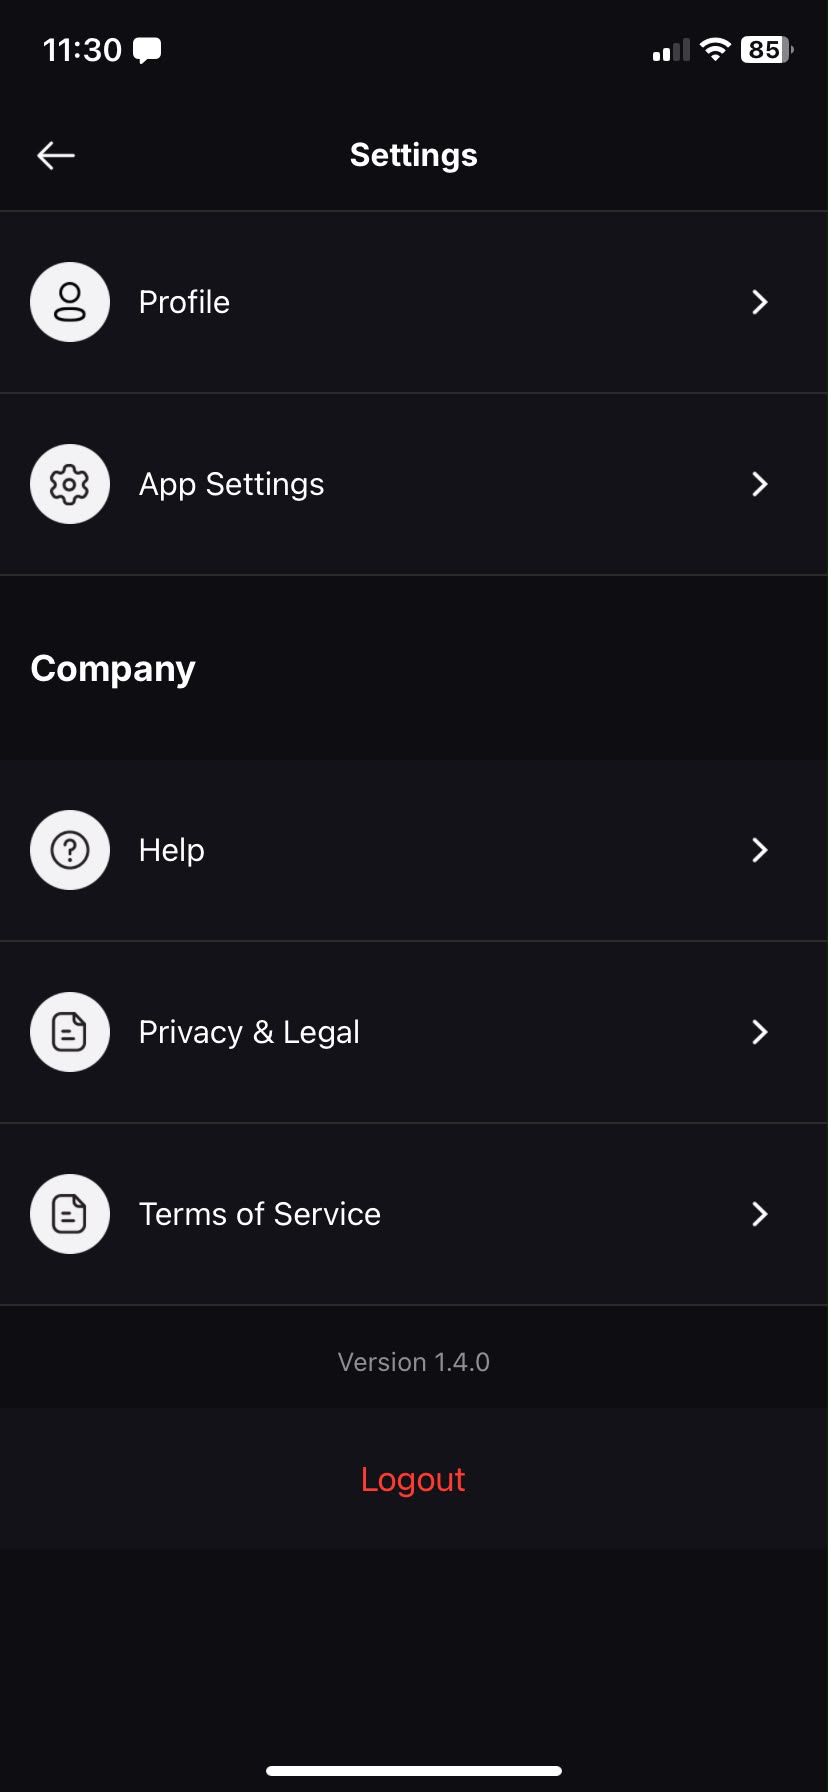
Where are the settings?
There's no separate Settings tab. To open Settings (and your profile), go to the PinBoard tab and tap your profile picture or your college name at the top of the screen.
 📷Screenshot: Settings screen
Your profile
Keep your photo and display name up to date so people recognise you across chats and the PinBoard.
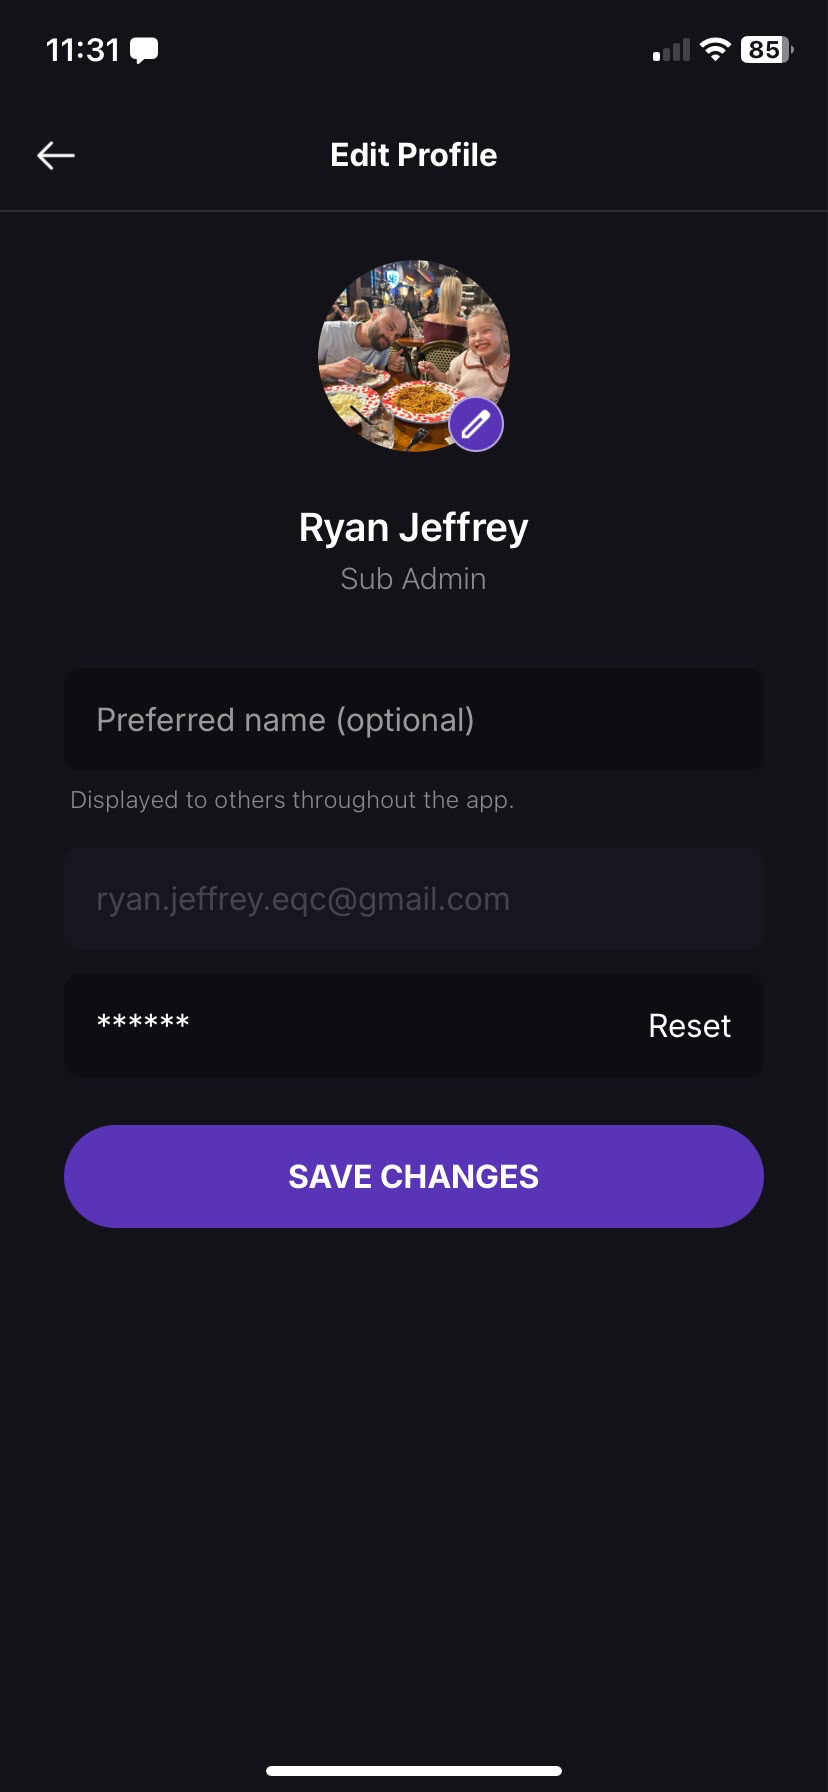
Open your profile
- Go to the PinBoard tab and tap your profile picture (or college name) at the top to open Settings.
- Tap Profile to open the Edit Profile screen.
 📷Screenshot: Edit Profile screen
Change your photo
- Tap your photo (it has a small pencil badge).
- Choose Camera, Gallery, or Remove Photo (Remove only appears if you already have a photo).
- Position the photo in the circular cropper, then confirm.
Change your display name
In the Preferred name box you can set the name shown to others throughout the app (up to 30 letters). This doesn't change your official name on your account.
Save your changes
Tap SAVE CHANGES. You'll see a "Changes saved!" confirmation.
Change your password
- On the Edit Profile screen, tap the password Reset row.
- Enter your current password, then your new password and confirm it.
- Your new password must be at least 10 characters and the two new-password boxes must match.
Notifications & appearance
Control which push notifications you receive and switch between light and dark mode.
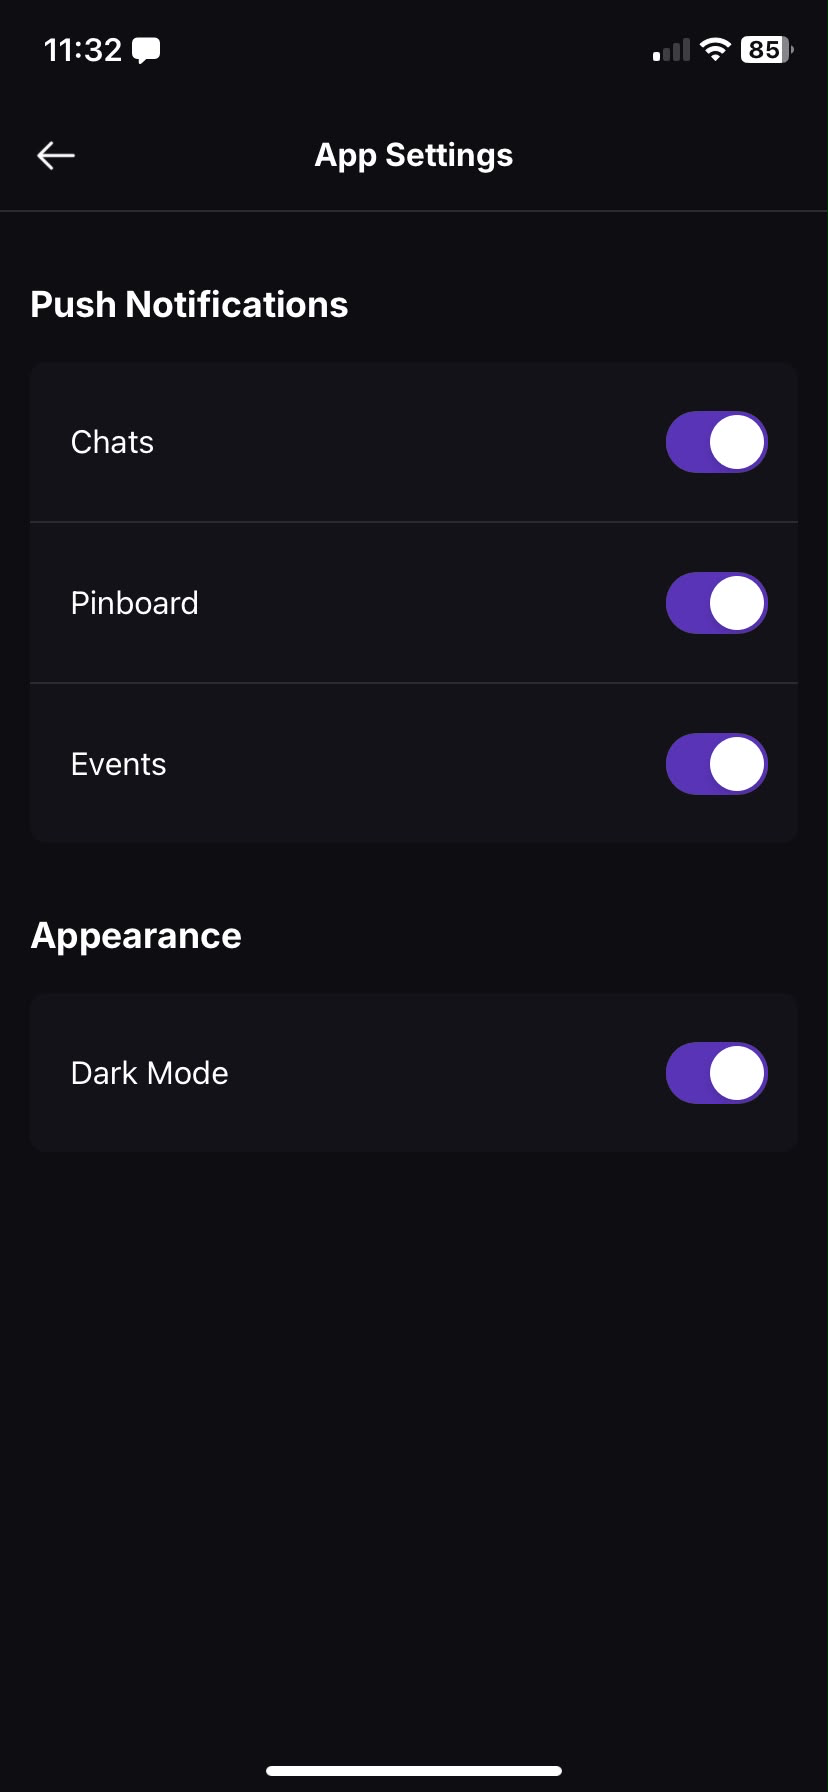
Open Settings (tap your profile picture on the PinBoard tab), then tap App Settings.
Push notifications
There are three independent toggles. Turn any of them off to stop those notifications:
- Chats — new messages.
- Pinboard — new posts and activity.
- Events — event updates.
Dark mode
Under Appearance, switch Dark Mode on or off. The app remembers your choice.
 📷Screenshot: App Settings screen
One-on-one chats
The Chats tab works like WhatsApp, Signal or iMessage. Here's how to start a private conversation and everything you can do inside one.
The chat list
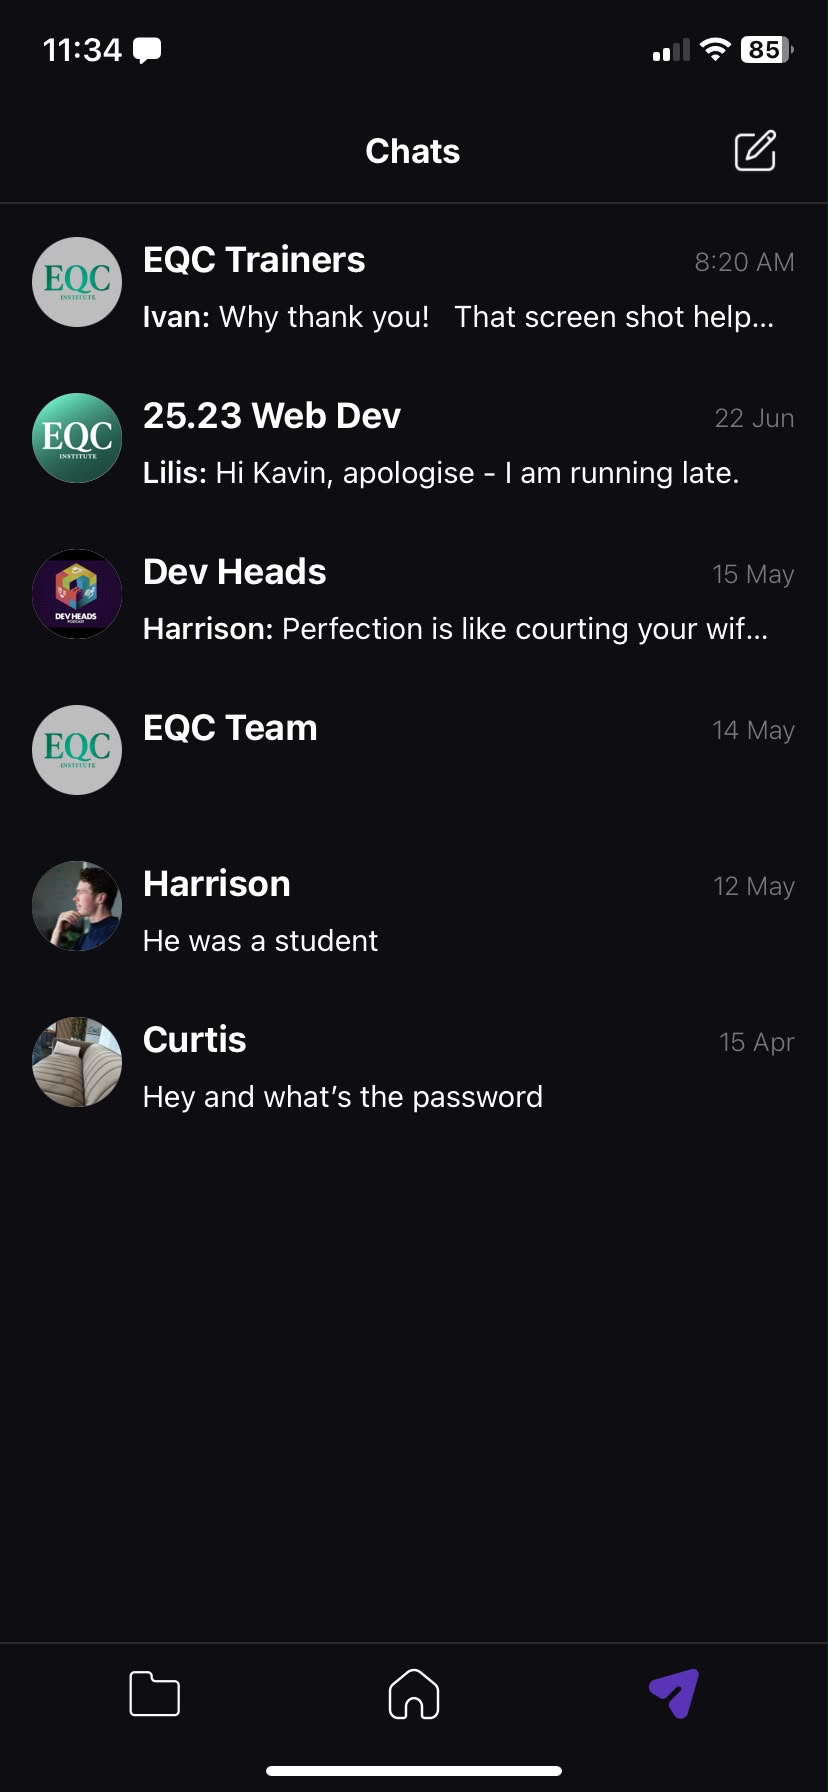
The Chats tab shows all your conversations, each with a photo, name, a preview of the last message, the time, and an unread count. Pull down to refresh, and use the search bar to find a conversation by name.
 📷Screenshot: chat list
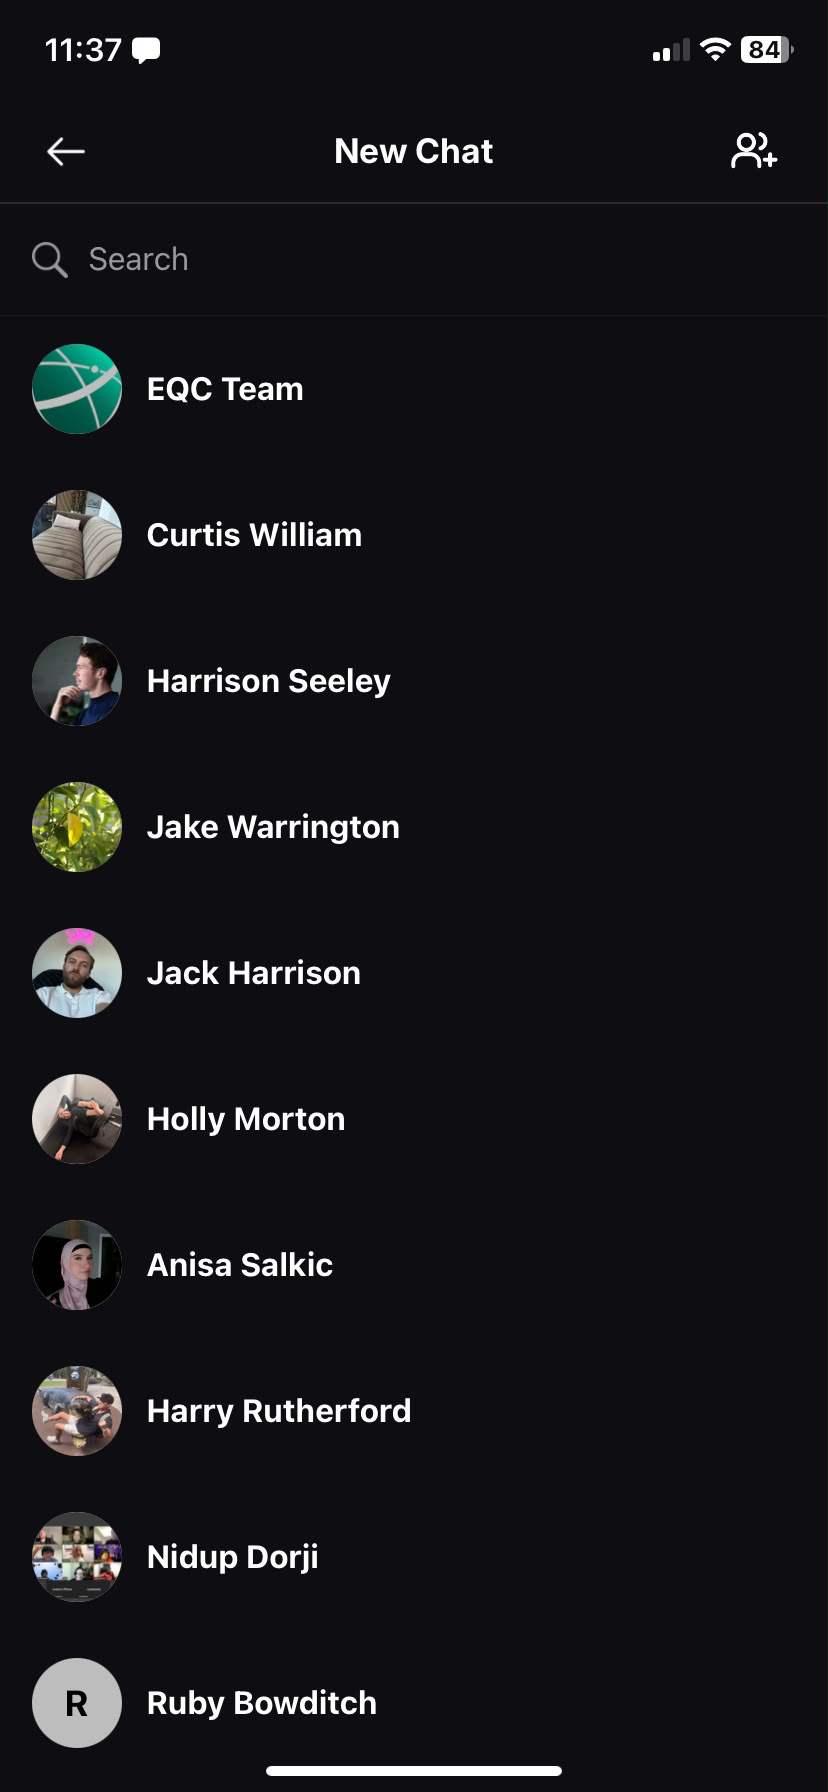
Start a one-on-one chat
- On the Chats tab, tap the compose icon in the top-right corner.
- On the New Chat screen, search for the person you want.
- Tap their name — your conversation opens straight away.
 📷Screenshot: New Chat people picker
Sending messages
Type in the Message box and tap the send (up arrow) button. To send media, tap the attachment button to open the tray, where you can choose:
- Camera — take a photo or video.
- Photos — pick one or several photos/videos from your device.
- GIF — search and send a GIF.
You can quickly select several photos from the grid at the top of the tray. Videos are automatically compressed before they send.
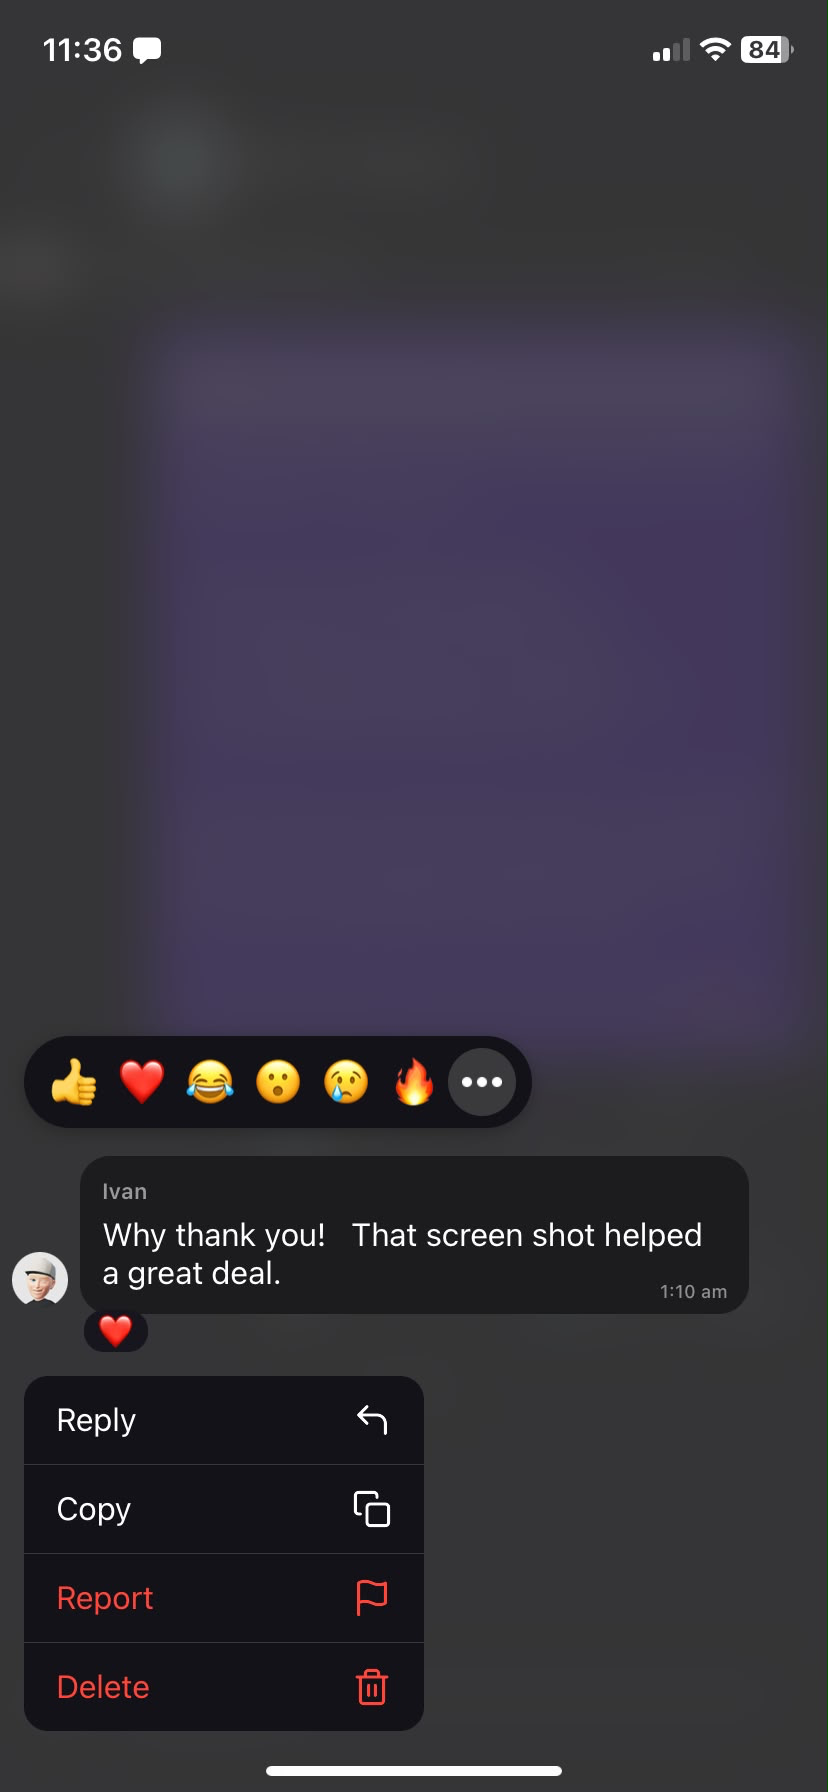
Replying, reacting and more
- Reply — swipe a message sideways, or press and hold it and choose Reply. Tap a reply later to jump back to the original.
- React — press and hold a message to show the quick reactions (👍 ❤️ 😂 😮 😢 🔥), or tap + for the full emoji list. You can also double-tap a message to add a ❤️.
- See who reacted — tap the reaction badge under a message.
- Copy — press and hold a text message and choose Copy.
- Save media — press and hold a photo or video and choose Save to download it to your device.
- Edit — you can edit your own message for a short time after sending. After that you'll see "Edit window expired".
- Report — on someone else's message, press and hold and choose Report.
- Delete — you can delete your own messages. Admins only Administrators can delete anyone's message.
 📷Screenshot: message reactions & actions
Read receipts & typing
A single tick means your message was sent; a double tick means it's been read. When the other person is typing, you'll see a typing indicator.
Managing a conversation
Press and hold a conversation in the list (or swipe it) to see options such as Block. Admins only Deleting an entire conversation (which removes it for everyone in it) is limited to administrators.
Group chats
Group chats let several people message together. Admins only Creating a new group is limited to administrators — staff can use and help manage groups but start one-on-one chats only.
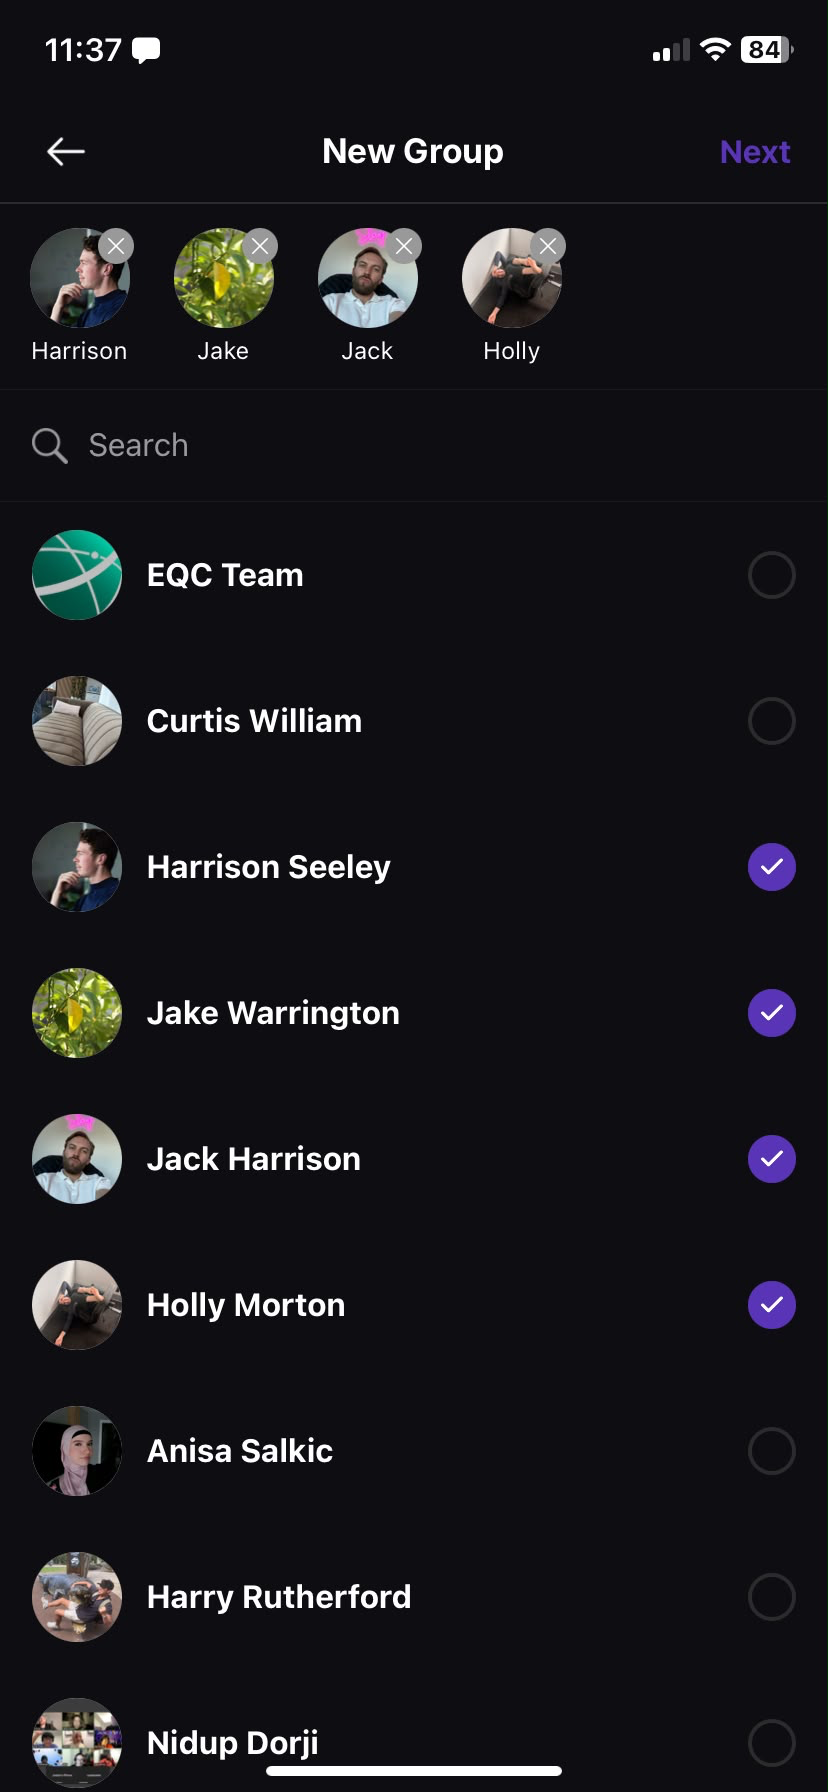
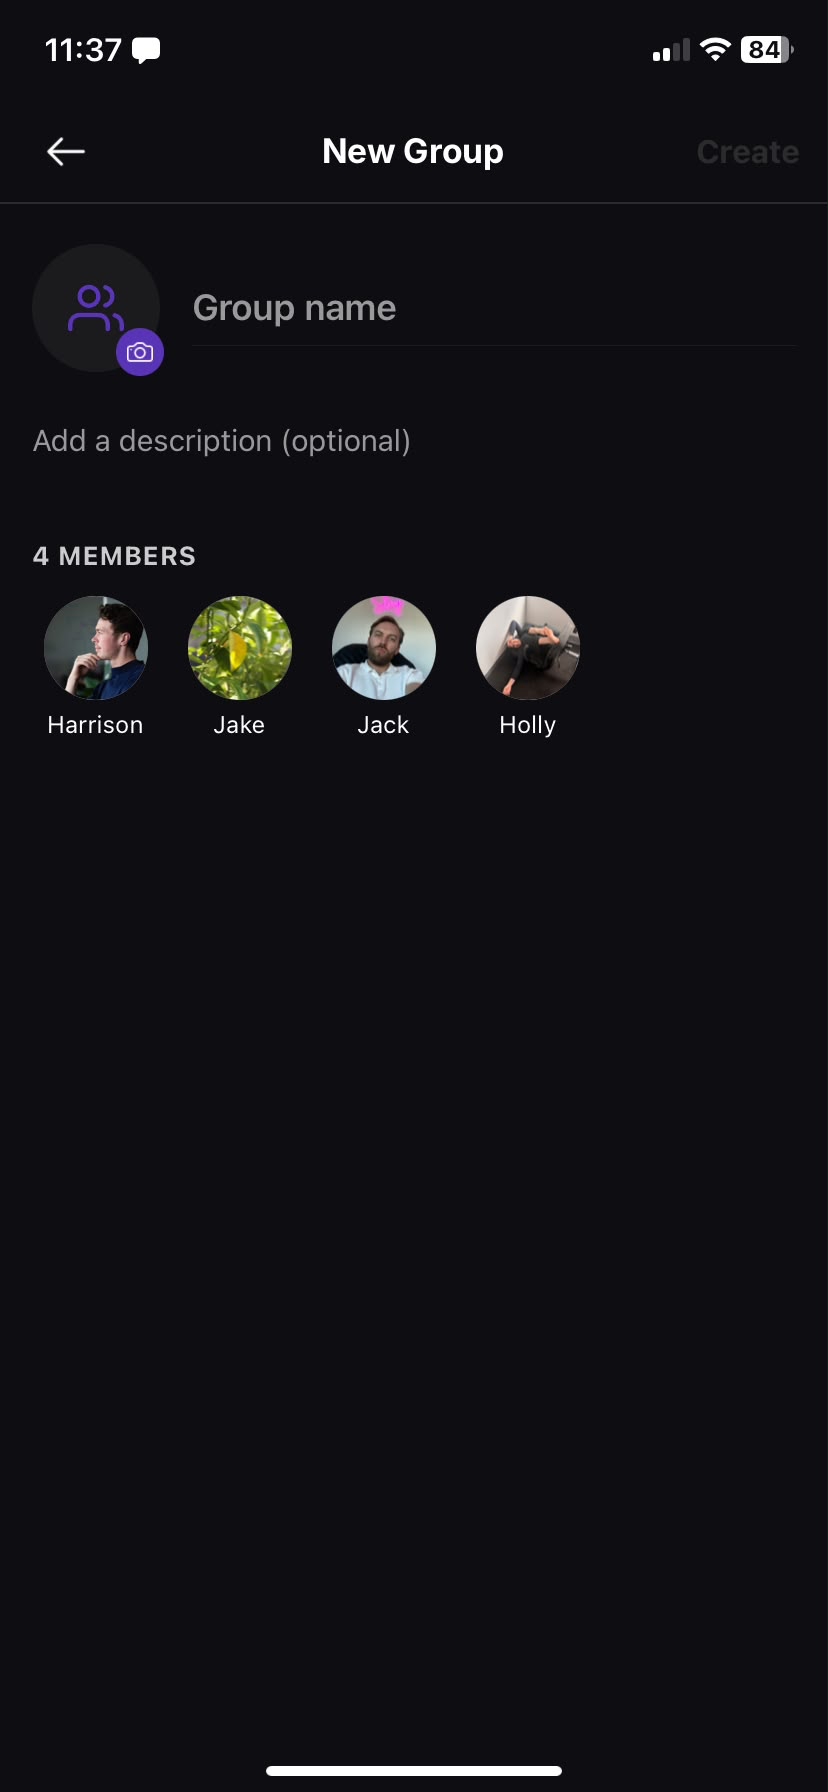
Create a group Admins only
- On the Chats tab, tap the compose icon, then tap the group icon in the top-right to switch to New Group mode.
- Tap people to select them — they appear as chips along the top. Tap a chip to remove someone.
- Tap Next.
- On the New Group setup screen, add a group photo (Camera or Gallery), a group name (required, up to 30 characters) and an optional description (up to 200 characters).
- Tap Create.
 📷Screenshot: selecting members
 📷Screenshot: New Group setup
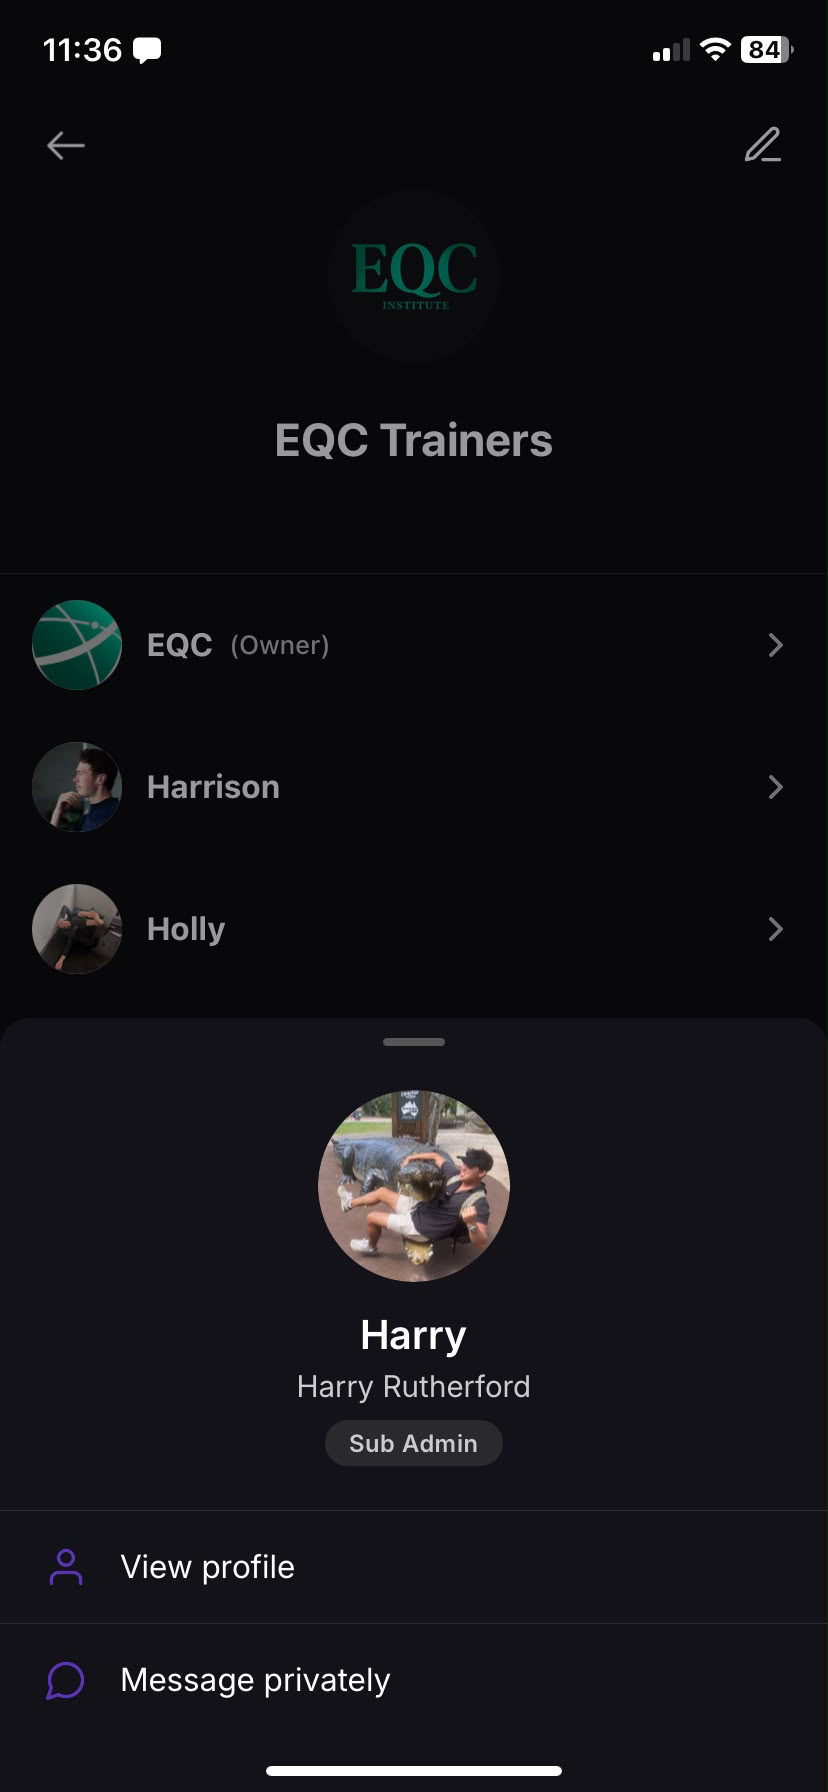
Group details & managing members
Inside a group chat, tap the group name or photo at the top to open Group Details, where you can see the photo, name, description and member list (each member shows their role, and the creator shows an Owner badge).
Staff and administrators can also:
- Edit the group — tap the pencil icon to change the group's name, description or photo.
- Tap a member to view their profile, message them privately, or remove them from the group.
 📷Screenshot: Group Details screen
 📷Screenshot: member actions sheet
Creating posts
The PinBoard is your college's social feed, styled like Instagram. Everyone except students can create posts.
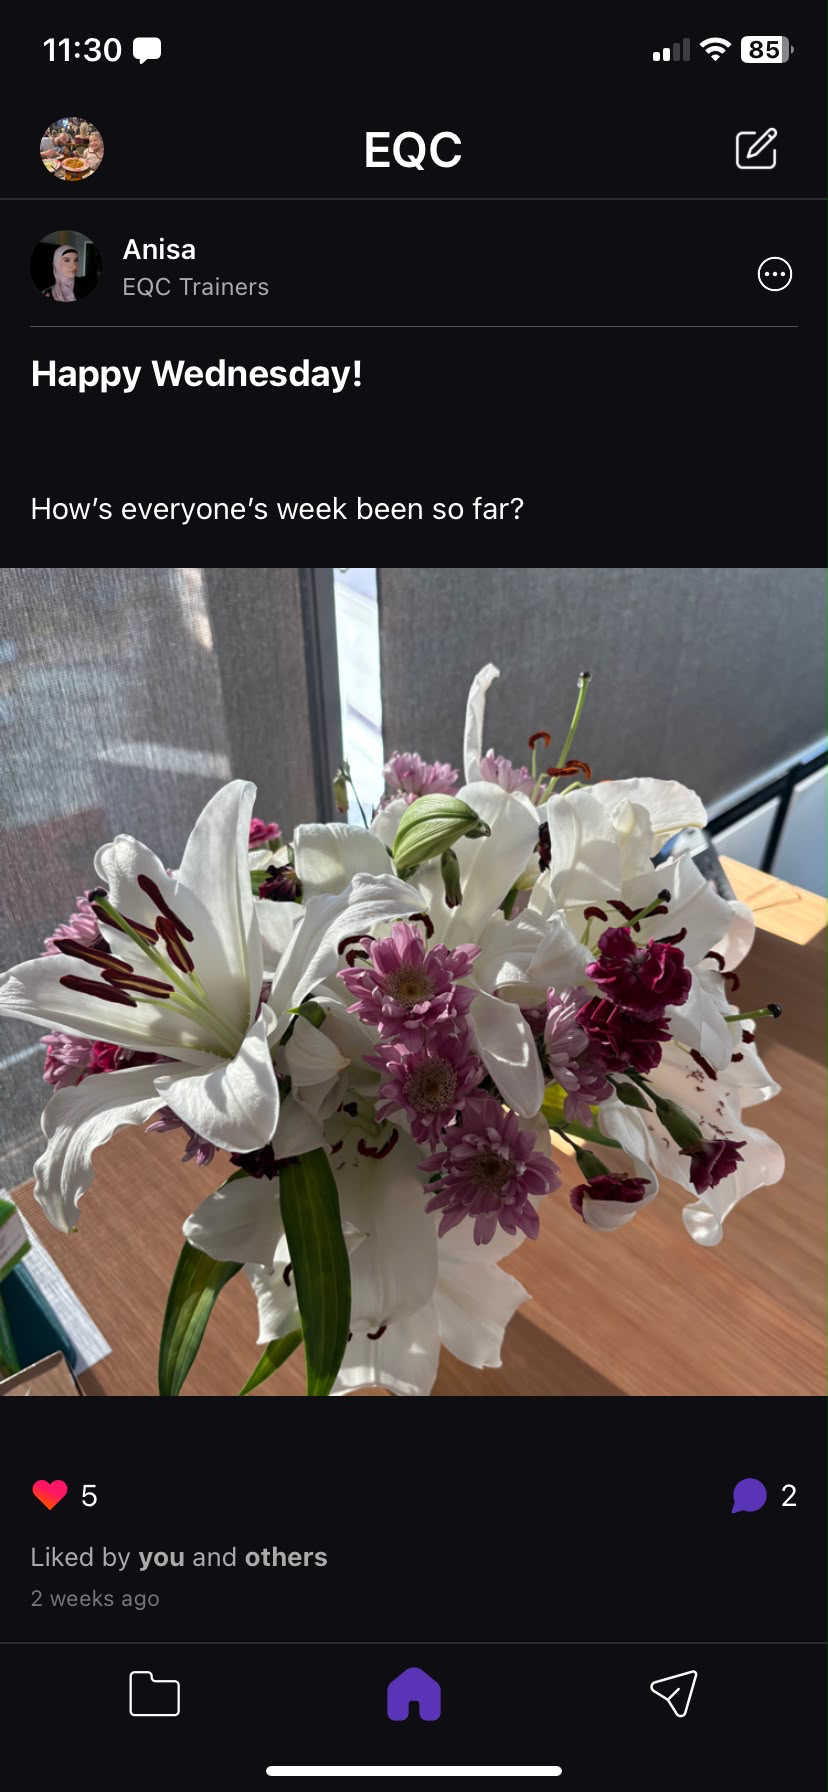 📷Screenshot: PinBoard feed
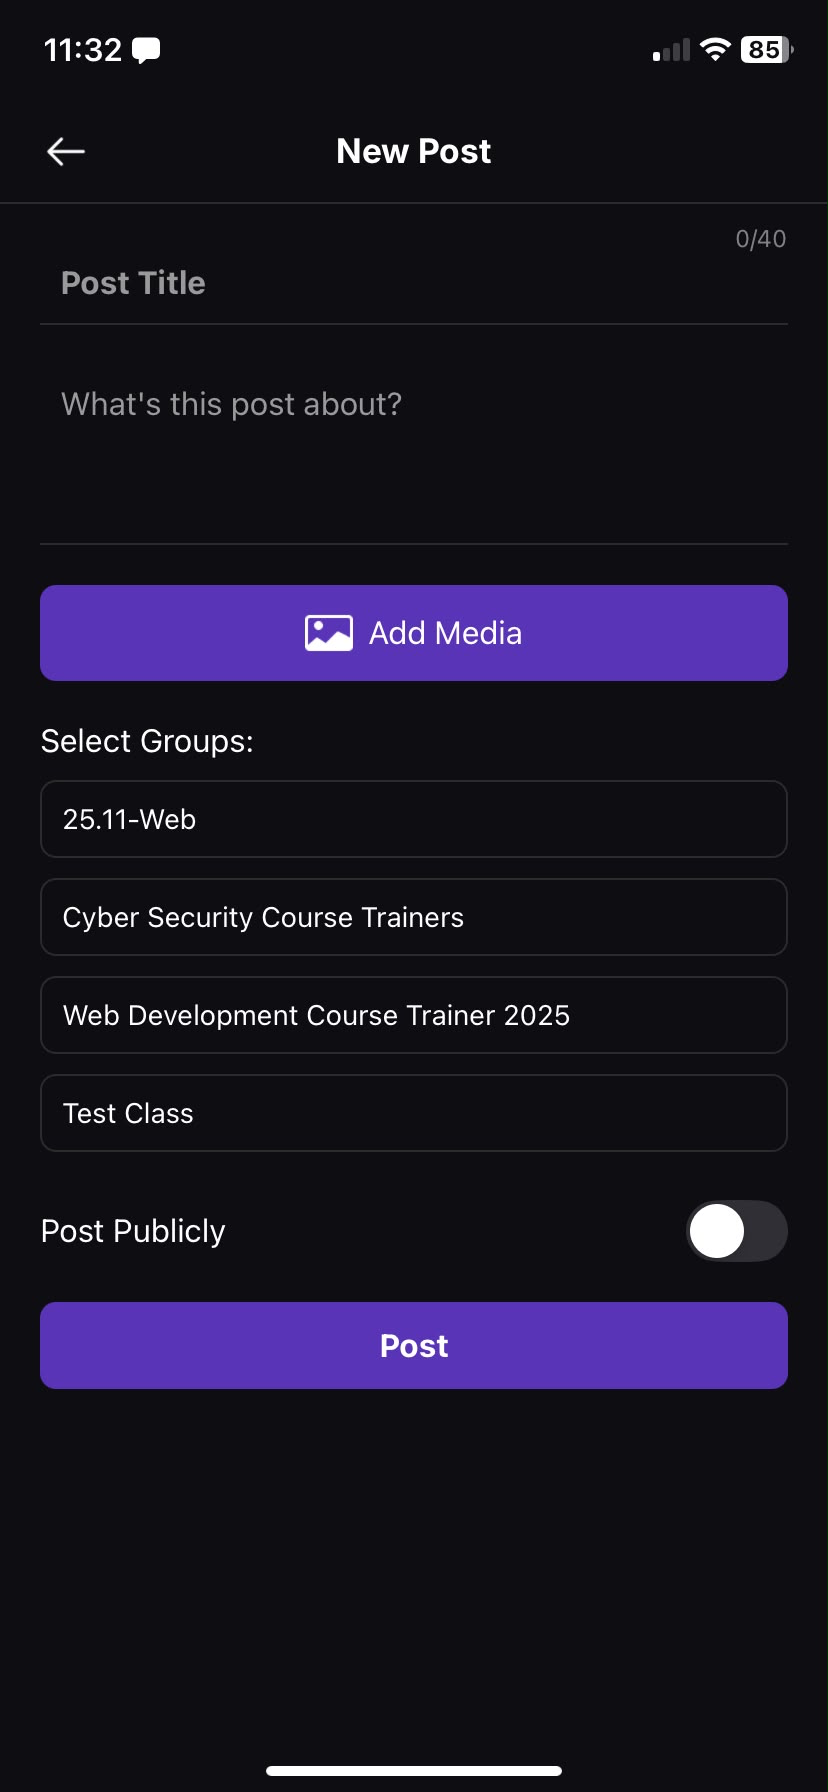
Create a post
- On the PinBoard tab, tap the create post icon in the top-right corner.
- Add a Post Title and your content (the "What's this post about?" box).
- Tap Add Media to attach photos or videos from your Camera or Gallery. You can add several — they show as preview thumbnails (videos show their length). Tap the ✕ on a thumbnail to remove it.
- Choose who sees the post (see below).
- Tap Post. (The button is disabled while media is still uploading.)
 📷Screenshot: New Post screen
Choosing who sees your post
- Staff: choose one group to post to from the Select Groups list. You can only post to one group at a time, and you must pick a group before you can post.
- Admins only Administrators also have a Post Publicly toggle, which shares the post with everyone.
Editing & deleting your posts
On any of your own posts, tap the ⋯ (more) menu to Edit or Delete it. You can only edit and delete your own posts. Admins only Administrators can delete anyone's post.
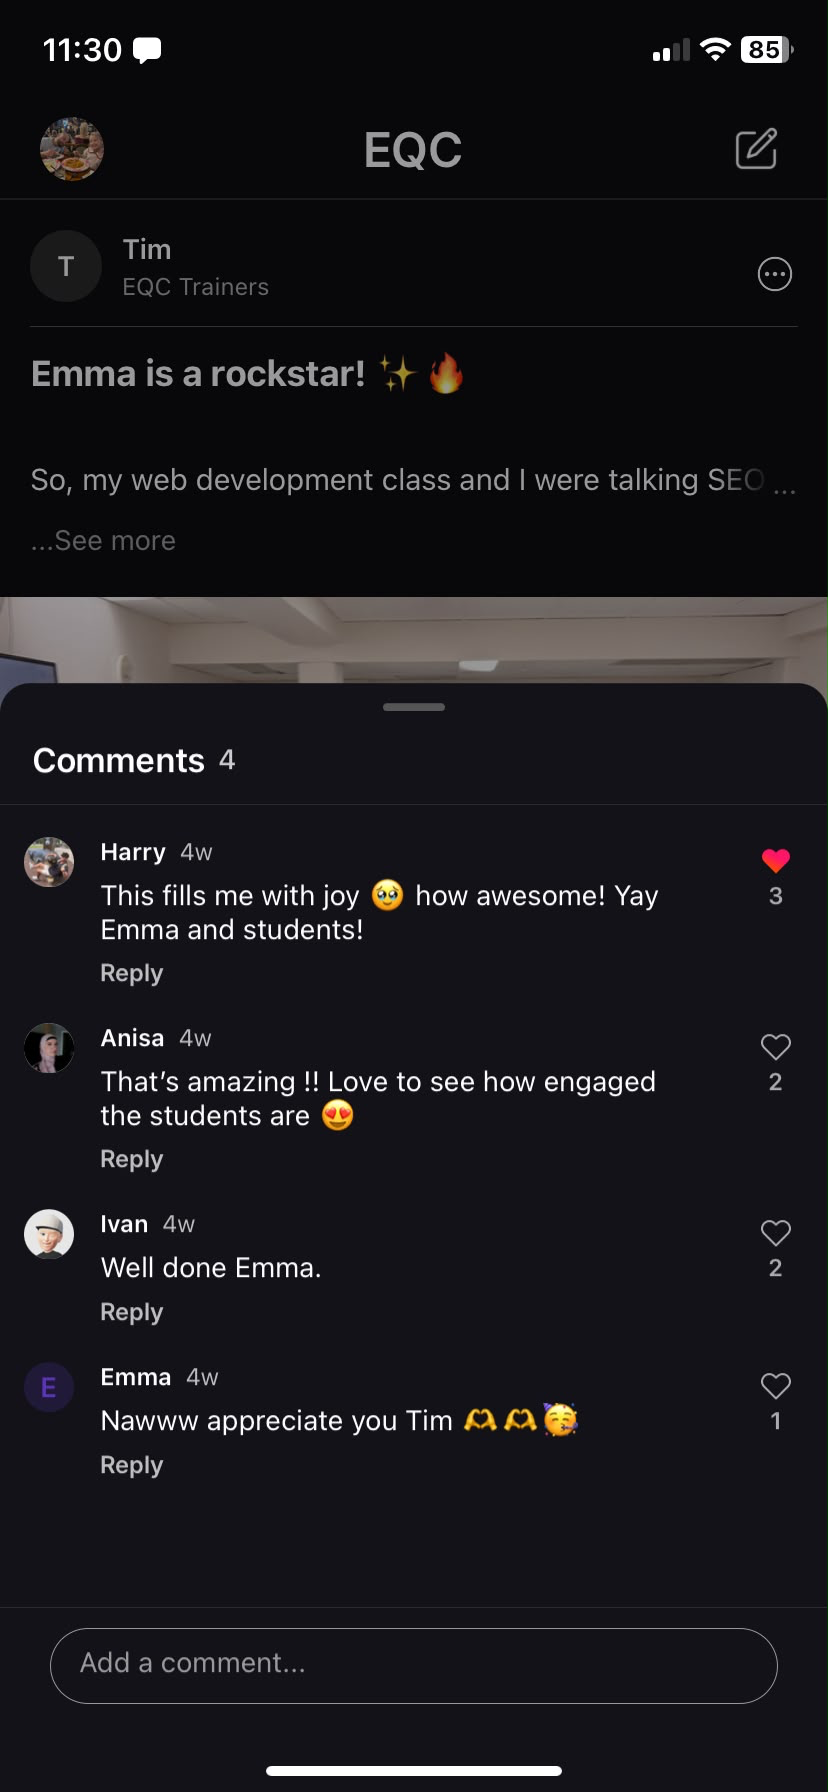
Likes & comments
Posts work just like Instagram — like them, see who liked them, and join the conversation in the comments.
Liking a post
- Tap the heart icon to like a post, or double-tap the post for a heart animation.
- The Liked by… line names people who liked it. Tap "and X others" to see the full list.
Comments
- Tap the comment icon to open the comments sheet.
- Type in Add a comment… and send.
- Reply to a comment to start a thread (replies are grouped, with "View more replies").
- Tap the heart on a comment to like it.
You can edit and delete your own comments. Admins only Administrators can delete anyone's comment.
 📷Screenshot: comments sheet
Resources
The Resources tab is where your college shares files and documents.
- It's organised into folders and files, each with an icon showing its type (PDF, document, image, video and so on).
- Tap a folder to open it; use the back button to go up a level.
- Tap a file to download and open it in your device's viewer. On Android you may be asked to allow storage access the first time.
- Pull down to refresh the list.
 📷Screenshot: Resources browser
Notifications
StudyPass sends push notifications so you don't miss new messages and posts.
- Tapping a push notification takes you straight to the message or post it's about.
- You control which notifications you get from Settings → App Settings → Push Notifications, with separate toggles for Chats, Pinboard and Events.
Account, help & signing out
Everything else lives in Settings — tap your profile picture on the PinBoard tab to open it.
Help & legal
- Help — guidance within the app.
- Privacy & Legal and Terms of Service — open these documents inside the app.
- The app version number is shown near the bottom of Settings (handy if you ever contact support).
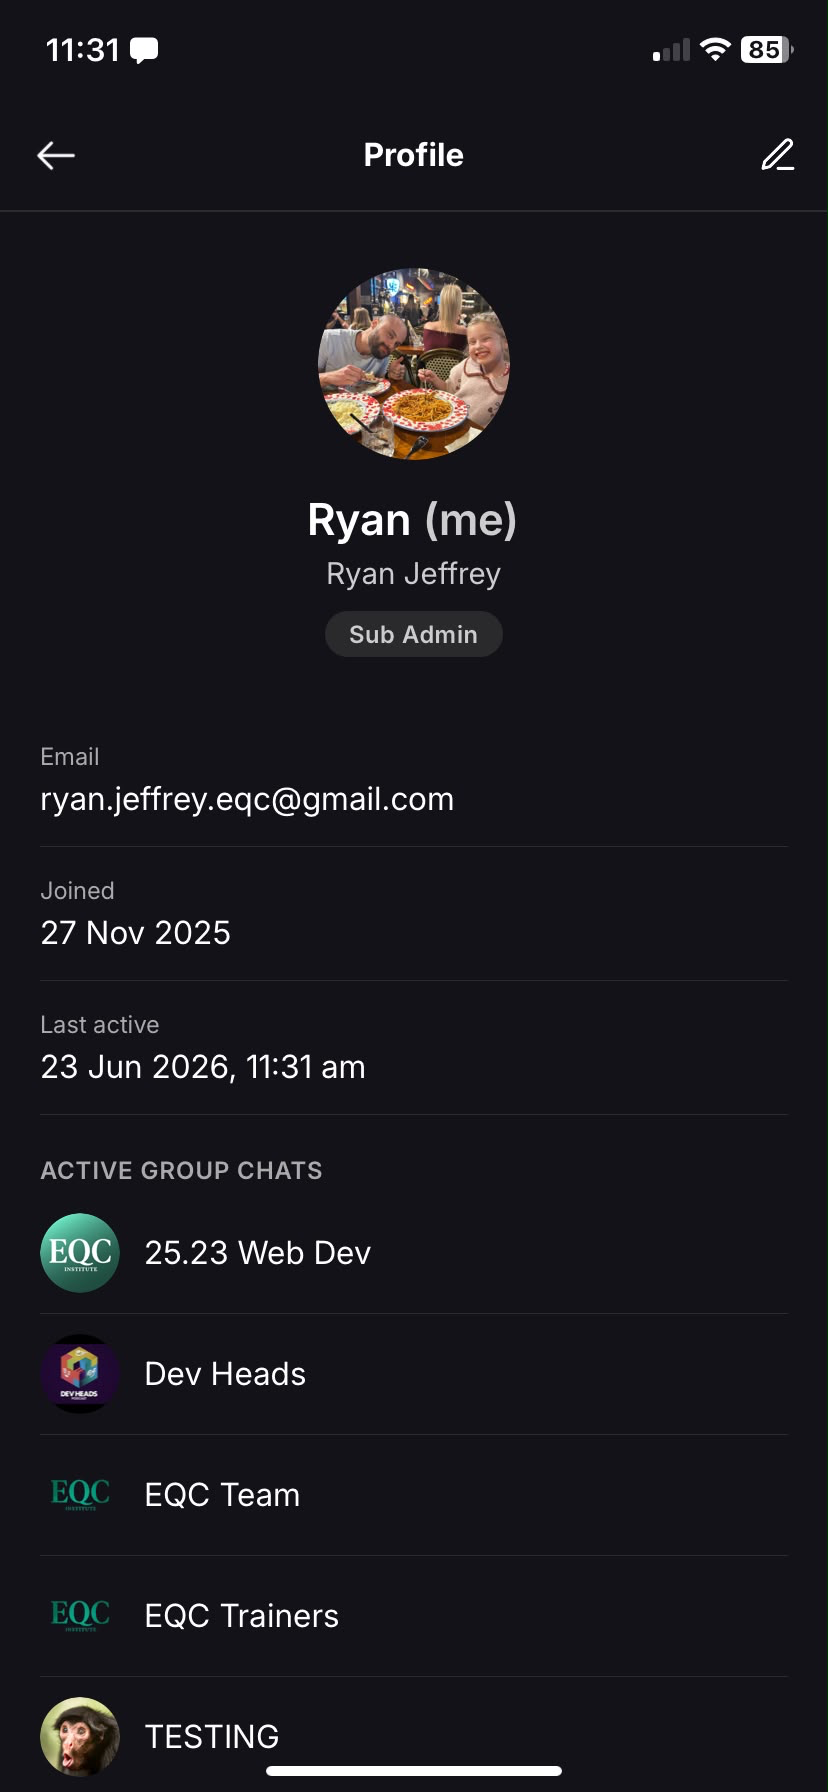
Viewing other people's profiles
Staff and administrators can tap a person (for example in a group's member list) to view their profile — their photo, display name, role and the groups they're in — and start a private message from there.
 📷Screenshot: a user's profile
Switching to a different college
There's no in-app switch between colleges. To use a different college, sign out and enter that college's identifier on the welcome screen.
Signing out
- Open Settings.
- Scroll to the bottom and tap Logout.
- Confirm by tapping Yes. You'll return to the welcome screen.
Who can do what
Staff (educators) can do almost everything. A few abilities are reserved for administrators and sub-administrators. Here's a quick comparison.
| Action | Staff | Admin / Sub-admin |
|---|---|---|
| Start a one-on-one chat | Yes | Yes |
| Create a group chat | No | Yes |
| Edit a group & manage its members | Yes | Yes |
| Delete an entire conversation | No | Yes |
| Delete someone else's message | No | Yes |
| Create a PinBoard post | Yes | Yes |
| Post to a group | Yes | Yes |
| Post publicly (to everyone) | No | Yes |
| Edit / delete your own posts & comments | Yes | Yes |
| Delete someone else's post or comment | No | Yes |
| View other people's profiles | Yes | Yes |